0

Presenting Memory Feats

Published on Sunday, February 27, 2011 in , , , , , ,

David Allen's photo of Dr. Wilson's Memory Elixir ShowIn any demonstration where you show the powers of the mind, it's all too easy to appear as a show-off, and create animosity in your audience. How do you engage your audience, instead of having them resent you as being a know-it-all?

One of the most common ways is used, appropriately, when the memory demonstration is being used to promote a course or other memory product. It's the simple attitude of, “You can do this, too!” Basically, you're grabbing their interest by providing hope that their mind can be just as powerful as the demonstration they've seen you do.

To give you an idea of how effective this can be, check out the following memory infomercial introduction. It's a good demonstration of a proper set-up, as it begins with everyday people taking about how an improved memory bettered their lives, and only in the last seconds does it even mention an amazing memory demonstration (recalling the names of everyone in a studio audience):


This is great if you're teaching people to improve their memory, but what if you're doing a theatrical performance? You want this to seem impressive, yet without appearing as a show-off.

There's one theatrical technique that comes in very handy here, known as “distancing”. This is simply a technical term for presenting a piece as if someone else were responsible for what happens. Magician David Copperfield used this very effectively in a card routine on one of his specials.

Back in the 1940s and 50s, there was a Magistrate by the name of Canuto who brought in extra money by performing talks that included memory demonstrations. His angle for removing the audience antagonism was to explain that bookmakers could only be effectively prosecuted with betting slips found on his person. He continued to explain that the smarter bookies would develop their memories so as not to be caught with evidence.

From the audience's point of view, Magistrate Canuto wasn't showing off his own memory skills, but simply showing what is possible by clever bookmakers, and the fascinating things that can make a magistrate's job even tougher. Interestingly, by performing an impressive memory feat, such as remembering 20-30 items in and out of order, and then asking the audience to imagine a bookie that can do that with thousands of accounts, he can take the edge off even further while still astounding the audience.

Another related, yet distinct, method of distancing is to credit an inanimate object with powers or feelings that people know it can't possess. This is known in psychology as a “metaphor restriction violation”, or a “Selectional Restriction Violation”.

When presenting this in a theatrical setting, the audience understands that the object can't really do what the performer is saying, so the audience themselves figures out that the performer is properly credited with the ability. Note how different this mental attitude is compared to a performer who states outright that you should take what you see as proof of his greatness.

In memory acts, this is often done by crediting some substance that gives anyone an incredible memory. Performer Jack Kent Tillar, for example, is known for his Memory Pill Act, which is just like it sounds: A pill gives anyone who swallows it great powers.

Another amusing take on this approach is Pit Hartling's amusing memory routine in which he credits orange juice for his remarkable memory.


There's nothing saying these approaches have to be distinct. Take Dr. Wilson's Memory Elixir, for example. Paul Szauter performs as Dr. Wilson, and old-time medicine pitchman. Already, he's created distancing by performing as a character from another era, and an literal snake oil saleman at that. The audience quickly figures out that such a character shouldn't be taken too seriously.

On top of that, it's the amazing elixir that is the claimed cause of the amazing memory feats. Not only does the audience see through this claim and credit the performer with an amazing memory, just as with Canuto's bookie presentation, but the audience gets the satisfaction of seeing through the pitchman's scam, as well!

This MP3 clip of Dr. Wilson's show will give you an idea of just how effective this can be. Notice that, at the end of the clip, he even brings it around on the audience by pointing out that unusual feats help remind people that they can and should remember what's important to them, and to focus on those things.

This is hardly an exhaustive list of approaches for engaging people with mind feats. As a matter of fact, I discuss other approaches used in magic performance in my Understanding Magic essay.

My main goal here is to start you out thinking about how to better present your mental feats, even if it's just for friends and family.

0

Mental Math Videos - FREE!

Published on Thursday, February 24, 2011 in , , , ,

Ianmacm's number pictureWant to improve your mental math skills? In this post, we've got a host of videos that will show you how to figure problems in your quickly and easily!

Total Breeze – These are some of the most nicely-produced mental math instruction videos of the group. There are 12 videos posted for free. Most cover specific aspects of mental math, but the intro video gives a great mix:


Mental Math Secrets – These videos are part of a video podcast series. Only 6 are available online, but the full collection of 16 are available for free online via iTunes and the MathTutorDVD homepage.


Simply Outrageous Math – Like Total Breeze above, the Simply Outrageous Math are a teaser for a commercial set of videos. However, the ones they've made available for free are quite helpful, and the teaching style is quite effective.


Fast Math – Glad2Teach brings us a small set of mental math videos, but they do include some tricks I've never found in the other series.


How to Do Math In Your Head – This is a rarity. It's a free mental math video series done just for the purpose of instruction over at eHow, as opposed to promotion.


Do you have any favorite mental math videos, whether individual or part of a series? Tell me about them in the comments!

0

New Unit Circle Tutorial

Published on Sunday, February 20, 2011 in , , , , ,

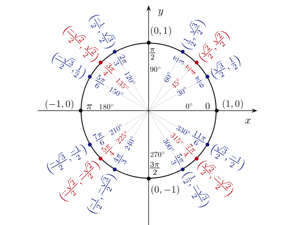
Jim Belk's unit circle illustrationI've posted a new tutorial over at the Mental Gym. It's designed to help you better understand and remember one of the most feared structures in mathematics: The Unit Circle!

Because the unit circle combines pi, degrees, radians, circles, triangles, sines, cosines, and cartesian coordinates, it can often seem intimidating and confusing. I'd tried to break it down clearly and simply, and build it up step-by-step, so that everything was clear.

Naturally, I wanted you to be able to remember it, so there are mnemonics and videos throughout that will help lock all the concepts in your memory. By the time you're done with this tutorial, you'll be calculating sines and cosines of angles with nothing more than your brain and your fingers!

At one point, I even use the Pythagorean theorem to advance understanding of the unit circle. Since the Mental Gym Unit Circle tutorial speaks for itself, I'll spend the rest of this post on the Pythagorean theorem as a sort of bonus.

As you probably remember from high school, if you draw a right (90°) triangle, the side opposite that 90° angle is the hypotenuse, and the other two sides are simply referred to as a and b. The Pythagorean theorem states that, in a right triangle:


Usually, it's simply stated this way:


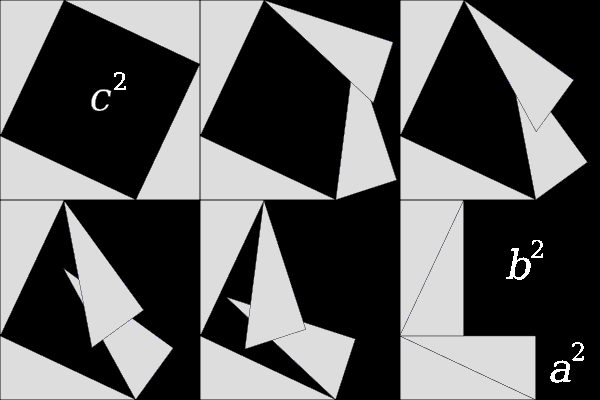
The more you examine this formula and the effects behind it, the more startling and beautiful its simplicity becomes. It can even be proved without words:

John Blackburne's Pythagorean theorem proof animation
Often, in school, you're given two major types of problems concerning the Pythagorean theorem. In the first type, you're given two sides, such as a side of length 3 and a side of length 4, and asked to find the length of the hypotenuse. In our 3 and 4 example, we would work it out this way:


In the other type, you're given the length of one side and the length of the hypotenuse, and have to work out the length of the remaining side. If we're given 5 as the length of one side, and 13 as the length of the hypotenuse, we work it out like this:


Notice that the answers always seem to magically work out to be whole numbers. Any set of three whole numbers that fits into the Pythagorean theorem is known as a Pythagorean triple. If you click on that link, you'll see that plenty of them are known, and others aren't difficult to find.

Here's a different sort of Pythagorean theorem problem that requires a different sort of approach. It's so different, that you'll probably never encounter it in the average school quiz. Let's say you're given a side length of 8, and asked to find all the possible Pythagorean triples with whole number answers involving 8. Surprisingly, it's easier than you think, with a little help from the following slideshow.


Those are your trig lessons for the week. Your homework is listed on the final page of the unit circle tutorial.

0

Quick Snippets

Published on Thursday, February 17, 2011 in , , , , , ,

Luc Viatour's plasma lamp pictureToday's snippets deal with updates galore!

• If you enjoyed Chocolate Nim, Presh Talwalkar over at the Mind Your Decisions blog, has posted a chocolate-themed math puzzle that's also fun to chew over. Ben Vitale has more on the related game of Chomp, which I mentioned at the end of that article. For more Nim fun, check out the new Nim category I added!

• Thanks to the mention of Grey Matters on last week's Scam School, I received a spike in visitors. For more Gilbreath Principle amazement, check out Martin Gardner's Betting Game, courtesy of PokerWagers.net. The instructions could be clearer at one point, however. If they choose clubs and hearts, you should say, “OK, that leaves spades for you. Do you want me to bet on hearts or clubs?” Otherwise, proceed as instructed.

• Now that the update is in full swing, I can get back to regularly updating other features of the site. I'll now start posting videos as I come across them in both the video blog section and in the Miro feed.

• I also updated the Memory Effects PDF yesterday. In addition, I've also made sure that every document I post on Scribd is freely downloadable.

• I have a new public twitter list called Mnemonics. This site follows different accounts which are largely used to post mnemonics for everything from languages to trivia, and just about anything inbetween. If you know of any other twitter feeds that regularly post mnemonics, please let me know about them!

1

The Secrets of Nim (Chocolate Nim)

Published on Sunday, February 13, 2011 in , , , , ,

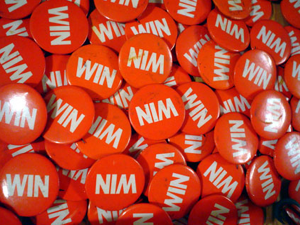
NIM is WIN upside down!(NOTE: Check out the other posts in The Secrets of Nim series.)

In this post, you'll learn the sweetest and most tempting version of Nim ever: Chocolate Nim! If you've ever eaten a Hershey's Milk Chocolate Bar by breaking it along the lines, you've been practicing for this.

Rules

Before we dive into the strategy for Chocolate Nim, we need to establish the rules of play. If you've played Nim before, these rules will be easily understood. If you haven't played Nim before, you'll want to check out the other Nim posts before trying this version out.
  • There are two players.
  • The players must alternate taking turns.
  • The game is played using any chocolate or candy bar whose surface can be broken along existing lines, such as a Hershey's Milk Chocolate Bar.
  • A turn consists of either breaking off 1 or more rows or 1 or more columns and eating them, or eating the remaining portion of the bar.
  • Neither player may break off a row AND a column on the same turn.
With these rules in mind, you'll quickly find that you can't play standard Nim, in which the person who eats the last piece is the winner. If you did, the winning strategy would be to simply eat the entire bar on the first move!

So, the chocolate version is always a Misère Nim game, in which the person who eats the last piece is the loser. Now, in previous versions of Nim, pretty much any object could wind up being the last one in play. To make Chocolate Nim an analyzable, and therefore winnable, game, one square needs to be specified as the piece to avoid. This gives us the final rules:
  • Before the play proceed, 1 individual segment of chocolate must be specified as the “losing segment”.
  • The person who eats the losing segment is, of course, the loser of the game.
Just for fun, you could suggest imagining that the losing segment is the poison segment, or the segment made of bitter chocolate.

Strategy

A standard Hershey's Milk Chocolate Bar has 3 rows and 4 columns, which is just large enough to make the game interesting, depending on which segment is chosen as the losing segment.

To start, you'll need to understand how to analyze multi-pile Nim. Make sure you've read and understood Part 2 of this Nim Series, as well as my post on visualizing multi-pile Nim.

To covert a given game of Chocolate Nim into a more familiar game of multi-pile Nim, all you have to do is count the number of columns to the LEFT of the losing segment (not including the losing segment itself), the number of columns to the RIGHT of the losing segment (again, not including the losing segment itself), the number of rows ABOVE the losing segment (yet again, not including the losing segment itself), and the number of rows BELOW the losing segment (still yet again, not including the losing segment itself). Each of these numbers is considered as a separate pile in multi-pile Nim.

Even though it's always a Misère Nim game (last person to remove an object loses), Chocolate Nim is actually equivalent to a game of multi-pile Nim in which the last person to remove an object wins (in other words, standard multi-pile Nim). Why is this?

The losing segment in is effectively a single item in its own special pile that nobody is allowed to touch until all the other piles have been removed. By being the last person to pick up a pile outside of that "special pile", you're forcing the other person to take the last item from that special pile.

I'll explain both of these concepts in more detail, with help from the illustration below.
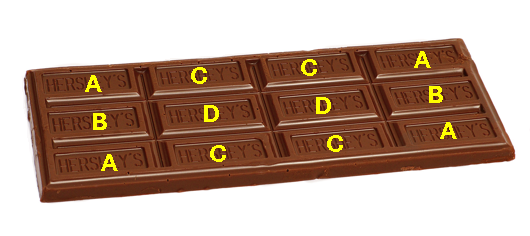
Evan Amos' Hershey Bar Picture with annotations
The corner pieces, labeled A, are the easiest to explain. Any corner piece has 3 columns to one side, and 2 rows either above or below it. This translates into a two-pile game of standard multi-pile Nim, with a pile of 3 objects and a pile of 2 objects.

If you've played standard multi-pile Nim before, this is ridiculously easy. You play first, and always leave your opponent with 2 piles of equal size, and you'll always be able to take the last piece!

In Chocolate Nim with a regular Hershey Milk Chocolate Bar, this translates into always leaving the same number of columns next to the losing corner piece as you do rows above (or below) that corner piece. In this way, you'll always be able to leave the losing segment for your opponent.

How about those pieces marked B? Either one of those have 1 row above them, 1 row below them, and 3 columns to the side. In standard multi-pile Nim, this is like playing with rows of 1, 1, and 3 objects. You play first, remove the pile of 3, and you can't lose after that. Obviously, the Chocolate Nim version of this simply involves playing first, and breaking off the 3 columns to one side of the losing segment. This version also means you get to eat all but 2 squares of the chocolate bar!

Each of the segments marked C have 1 column to one side, 2 columns to the opposite side, and 2 rows above it (or below it). At this point, you're probably already ahead of me. This translates into piles of 1, 2, and 2 objects. If you go first, remove the pile containing 1 object, and mirror the other player from that point on, you'll always win. Naturally, in Chocolate Nim, this simply means breaking off the single-column to the side of the losing segment, and leaving the same number of rows and columns for the other player from that point on.

Finally, we get to the segments in the center, marked D. Can you work out the equivalent game and solution on your own at this point? Don't worry, I won't leave you hanging.

Each center segment has 1 row above it, 1 row below it, 1 column to one side, and 2 columns to the other side. This time, we're playing a 4-pile game of standard multi-pile Nim, with piles of 1, 1, 1 and 2 objects. You should now be able to see why, in Chocolate Nim, all you have to do is play first, reduce the surrounding chocolate to 1 column to the left, 1 column to the right, 1 column above, and 1 column below. From there, you mirror the other player and you can't lose.

In all the above cases specific to the 3-row and 4-column Hershey Milk Chocolate Bar, you must always go first to assure your win. A good way to present this is to state that the other person gets to choose the losing segment, and that you get to choose who will go first. In the case we've taught above, you always go first.

Larger Chocolate Bars

Now that you understand how to win with a standard Hershey Milk Chocolate Bar, you can also analyze larger chocolate bars. For example, what if you wanted to play with a M&S Organic Fairtrade Milk Chocolate With Rose bar, which has 4 rows and 6 columns?

Start by explaining the rules to the other person, and mention that they'll chooses the losing segment, and then (and ONLY then!) you'll choose who gets to go first.

If you've practiced the strategies taught in both Part 2 of this Nim Series and the visualizing multi-pile Nim post, you should be able to work out whether it's to your advantage to go first at this point.

You could also use the Multi-Pile Nim Strategy Calculator and/or the Multi-Pile Nim Next Move Calculator, making sure that the piles are appropriately set, and that the Player who makes removes the last object is the: setting is set to Winner. This could also be a good way to practice.

If you know ahead of time that you're always going to be using a particular size bar, it would be worth your time to create a map of the bar and the appropriate strategies, as we did with the A, B, C, and D segments above.

Exceptions

You should be aware of similar problems which seems the same, but in which the strategies taught here don't apply.

The strategy above works well for candy bars broken into rectangular segments, regardless of the numbers of row and columns. However, if a candy bar were broken up into triangular segments, such as this, then the approach taught above will not work. That link does detail another strategy, however.

Even more tricky is the similar game Chomp. In Chomp, you work down to the poisoned segment (always in a corner), but you're working with both rows and columns, which nullifies the previous strategies. The strategies for Chomp are very different.

Closing Thoughts

Just for fun what about trying single pile Nim, standard or Misère, with a Toblerone bar? You could work the strategy out here.

Did you try this out? I'd love to hear any stories and thoughts you have on this game in the comments!

0

Scam School Meets Grey Matters...Yet Again!

Published on Wednesday, February 09, 2011 in , ,

Scam School logoIf you came here after watching this week's Scam School episode, I'll answer your first question right now: here's the Gilbreath Principle article Brian Brushwood recommended.

Thanks for the plug, Brian! Also, thanks to Mismag822 for suggesting this scam.

Let's jump right into this week's episode, and see exactly what this Gilbreath Principle can do for scammers:


On one hand, I'm glad to see this trick taught, as it's perfect for Scam School. On the other hand, the Gilbreath Principle is so great, I figure the fewer people who know about it, the better. Either way, it's out there, so I thought I'd provide my thoughts on this episode.

Brian correctly states in the video that there are four ways for a pair of cards to come up (red/red, black/black, red/black, and black/red), but since that's true, why does he get two of the four ways for himself to win?

With three people, I think Brian could've made the game seem more fair in the beginning if he'd said that there are only three different ways for a pair of cards to come up: red/red, black/black, and one of each color. It's a small lie, but one makes the game appear more fair, as any good scammer should do.

If you like this trick, and are intrigued by the faro shuffle Brian talks about this video, I suggest two major resources. First, use Stud playing cards, as they'll hold up to the required shuffling better than standard Bicycle playing cards, and will faro more easily.

Second, I highly recommend Michael Close's Learn the Faro Shuffle download. Besides getting the technique down more quickly and effectively, you'll learn some surprising things this shuffle makes possible. It takes more than a little work, but the effort is well worth it.

In this trick, it is obviously very important to have the cards riffle-shuffled, as the interweaving of the cards is what makes this routine work. If you're not sure of your audience's capability to perform a standard riffle shuffle, the “smash method” taught during the explanation is a good thing to have ready. The cards could also be spread in two face-down rows (not face-up, for the reasons described in the video), at which point you have an audience member pushed the two rows together to shuffle.

Finally, don't be afraid to experiment with the Gilbreath Principle, beyond what you learn in this video. With what other aspects of cards could you use this principle? What other scams or presentations can you develop?

Here's a great idea-starter for you. In episode 31, Brian teaches a trick he calls “Pigment Prediction”. The focus in this trick is on the red/red and black/black pairs.

However, try this trick out, and look closely at the discard pile. It has exactly the same qualities as a deck set-up with the Gilbreath Principle, and then given a single riffle shuffle, even though the audience can mix it up as much as they want in any way they want! What could happen when you mix the two of them?


Note: If you're wondering about the title to this post, it's a sort of sequel to the other two posts where Grey Matters was mentioned in Scam School - Scam School Meets Grey Matters and Scam School Meets Grey Matters...Again!.

0

America's Memory

Published on Sunday, February 06, 2011 in , , ,

DorkJr's photo of a United States map done with license platesLast October, I added the new Memorize USA Facts section to the Mental Gym, to help you remember things like the US Presidents, state flags, constitutional amendments, and more. Memory trainer Ron White has now taken that idea to the next level with his new America's Memory website.

While my Mental Gym post teaches the basics, such as memorizing states, capitals, and constitutional amendments, America's Memory will focus more on US history, including tips on remembering each aspect. The introductory video will explain more:


To kick things off, he starts off with a lesson in memorizing the Bill of Rights. His approach is very interesting, in that he uses 10 parts of the body to associate each section of the Bill of Rights:


The memory technique using the parts of the body from the top down seems very straightforward. However, there's one very interesting technique hidden in this video. Note the terms used for the various parts of the body in the video:

  1. Top (of the head)
  2. Nose
  3. Mouth
  4. Ribs
  5. Liver
  6. Joint (Hip joint)
  7. Cap (Kneecap)
  8. Fibula
  9. Ball (of the foot)
  10. Sand

Those of you who are familiar with the Major/Peg System will quickly recognize those first consonant sounds in conjunction with their corresponding numbers (except for S, which is 0, not 10, in the phonetic alphabet). Using the body parts is a nice easy way to introduce the concept of pegging one picture to another. Later on, when the phonetic alphabet is being taught to help remember numbers, the already-familiar body imagery can be used to lock in the new information much more easily.

If you're not familiar with Ron White, you can learn more about him via his website, YouTube channel, and Twitter feed. Having been familiar with his past work, this America's Memory site looks like it could be a very interesting project.

Update (Feb. 7, 2011): Ron White just added my US State Flag Mnemonic videos to the America's Memory site. Thank you, Ron!

0

Review: E-Z Square 1 and 2

Published on Thursday, February 03, 2011 in , , , , , , , , ,

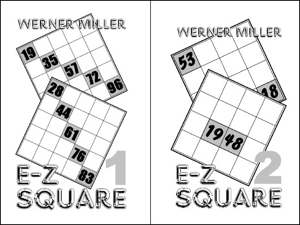
Werner Miller's E-Z Square bookletsWerner Miller has developed some great new approaches for magic squares, and has released them in two eBooks: E-Z Square 1 and E-Z Square 2.

E-Z Square 1

E-Z Square 1 (also available in German) focuses on a 5 by 5 magic square feat in which spectators call out various numbers which are written in the diagonal of the grid. The performer is then able to quickly place numbers in the remaining squares to give the same total in every row, column, and diagonal.

There are two methods taught, as well as a bonus. In the first method, once the spectators give the numbers for the diagonal, you fill out the remaining squares quickly, and in what appears to be in random order (although, there is an actual method to the madness). Naturally, there is math involved, but this is where Werner Miller's true genius shows through; the only math required is simple addition and subtraction and is applied consistently through the entire process.

Between the speed of filling in the remaining numbers, the size of the board, and the ways in which the totals can be achieved, this first method alone can be very impressive for an audience. Once you've mastered this, you're ready to move on to the second method.

With the second method, your audience members choose the order in which you fill out the remaining squares. The process is made more baffling, but is still the same as the first method. The addition here is that you need to memorize the pattern in a new way. The new approach is simple, and could even be made simpler with a little work, depending on personal preferences.

The bonus included is another handling for the first method. The bonus approach involves filling out five squares somewhat similar to the right-hand square pattern used in the Knight's Tour (if you add a center square, that is). As a matter of fact, those already familiar with the basics of the Knight's Tour will find that knowledge quite helpful.

E-Z Square 2

E-Z Square 2 (also available in German) turns to the more popularly-performed 4 by 4 magic square. Instead of just the rows, columns, and diagonals, as in the 5 by 5 version, there are 28 patterns that make the magic total in this version (there are actually more, but only 28 are taught).

First, simple patterns and some adaptations are shown. With this approach, there is the limitation that you can't generate a magic square for an odd total. At first, this seems like a fatal flaw. However, Werner Miller teaches some approaches that compensate for this, and a little creativity will yield other presentations that can overcome this obstacle.

The first presentation for this approach involves asking for a year special to the spectator, such as when they were born or married. These are placed together near the center of the square, another larger number is requested, and the resulting 4 by 4 square not only gives the total in 28 different ways, but also includes the given year!

There are some very helpful tips in the booklet, such as avoiding negative numbers and duplicates. The variations discussed include starting with other squares, including diagonals. There's also a bonus routine that involves using starting numbers chosen by the audience, and concluding with a prediction of the total!

Final Thoughts

Easily, the best thing about both of these methods is the simplicity of learning the systems. The instruction is clear and understandable, and you don't have to learn the mathematical reasons as to why this work, unless you find you want or need to do so.

Also, I like the fact that the resulting square hides the method well. I discussed the problems with some magic square methods in my post on Bill Fritz' free eBook Magic Squares for the Mathematically Challenged. As a matter of fact, many aspects of the magic square that you learn in that book could easily be applied to Werner Miller's approaches.

If you're just starting out with magic squares, these are great places to start. Not only are the basic methods of both quite simple, but they can get more impressive as your skills develop. I highly recommend both E-Z Square 1 and E-Z Square 2 for those interested in magic squares of all levels.